Showing posts with label mixed media. Show all posts
You Light Up the World – Stamp Soup Magic!

You Light Up the World – Stamp Soup Magic!

 Hello everyone!

Today I’m sharing a bright and whimsical card created with a mix of two of my favourite Stamp Soup sets – Lavender Tea and Magic Garden from Polkadoodles. These sets are not new releases, but they remain absolute gems – and right now, they’re on promotion at Polkadoodles!


I combined elements from both collections to build a dreamy, circular composition full of glowing colours and playful details. The background blends Distress Oxide inks in rich sunset tones – from deep violet and magenta to golden yellow – creating a radiant, magical atmosphere. The sentiment “You light up the world” perfectly captures the mood of this piece – joyful, imaginative, and full of light.

If you love mixing stamp sets and experimenting with colour, these two are a perfect match. Don’t miss the promotion on the Polkadoodles website – it’s the ideal time to rediscover these beautiful Stamp Soup designs!

Sending Hugs! Natalia x

Best Friend – Scribbly Textures in Motion

Best Friend – Scribbly Textures in Motion

 Hello my crafty friends!

Today I’m sharing a vibrant and expressive card made with the upcoming Muse & Maker release – Scribbly Textures Die Set, launching this Friday during Friday Night Live at 6:30 PM. This set is all about movement, texture and that perfectly imperfect scribbly style - ideal for adding energy and character to your projects.


For my background, I played with splashes of pink, yellow and black inks to create a colourful, textured base. Then I layered the Scribbly Textures dies - one in dark metallic tones and another in warm gold - to build a dynamic focal point. The sentiment “Best Friend” adds a sweet finishing touch, making this card perfect for someone special.

I love how these dies bring a modern, abstract feel to cardmaking - they’re perfect for mixed‑media lovers who enjoy experimenting with colour and composition. Don’t forget to join Lisa’s Friday Night Live at 6:30 PM - the full release will be revealed, and it’s packed with inspiration!

Crafty hugs, Natalia x

Merry Christmas – Textured Forest Magic

Merry Christmas – Textured Forest Magic

 Hello my crafty friends,

Today I’m sharing another card made with the beautiful Lisa’s Festive Collection. For this design, I used the Forest Die Set to create a richly textured background full of dimension and festive sparkle.


I worked with mixed‑media techniques — inks, embossing powders and microbeads — to highlight the tree pattern and give it a warm, rustic glow. The sentiment “Merry Christmas” stands out perfectly against the layered forest scene, making this card feel both cosy and elegant.

Crafty hugs, Natalia x

Handmade Christmas Bauble Card with Polkadoodles Crafts Sparkling Christmas Collection

Handmade Christmas Bauble Card with Polkadoodles Crafts Sparkling Christmas Collection

 Hello everyone!

Today I am excited to share a festive handmade Christmas card created using the Sparkling Christmas Collection from Polkadoodles Crafts.

To build this card, I started by ink blending each paper element to bring rich dimension and vibrant color to the project. I blended soft pink and coral tones onto the poinsettia flower layers, shaping them carefully to build a dramatic three dimensional focal point. I used lush green inks on the foliage, pine branches, and holly leaves to create natural depth around the ornament frame. Deep red hues were added to the berries and accent pieces, which I finished with tiny liquid drops for extra shine. Finally, I stamped Merry Christmas in the center of a circular wooden ornament frame, tied it with a golden hanging cord, and set it over an ink splattered watercolor background.

Watch the full creation process in action in the short video tutorial on my FB page!

Happy crafting! 

Natalia x

Magical Vellum Flowers with Polkadoodles Dies

Magical Vellum Flowers with Polkadoodles Dies

 Hi everyone!

Today I’m sharing a new tutorial where I create delicate vellum flowers with a soft, magical touch. I’ve been playing again with my favourite Polkadoodles dies, and this time I wanted to show how beautifully vellum works with poinsettia shapes.


In the short clip at the beginning, you can see the flowers I made earlier using the Dotty Poinsettia Flowers dies.
But in the tutorial itself, I decided to experiment with two different Poinsettia die sets from Polkadoodles to show how the flowers look in various sizes and styles.

For this project, I used thicker vellum, added fine texture on the back of each petal with a pokey tool, and then softly coloured them with Distress Oxide inks. I shaped the petals using a ball tool to give them a nice dimension and finished everything with a touch of glitter glue for that subtle sparkle.

These vellum flowers are perfect for handmade cards, tags, and mixed media projects. They look so delicate and elegant - and they catch the light beautifully!

If you’d like to see exactly how I made them, you can watch the full tutorial below 👇
🎥 Watch on YouTube

Materials used:

  • Polkadoodles Dotty Poinsettia Flowers dies

  • Two Poinsettia die sets from Polkadoodles

  • Thick vellum

  • Distress Oxide inks

  • Pokey tool

  • Ball tool

  • Glitter glue

 Don’t forget to follow me on social media for more inspiration:

Instagram - @nataliakuzakart

Facebook - @nataliakuzakart


Sending HUGS!

Natalia

Sunflowers & Honeycomb – Craft&You Design Inspiration

Sunflowers & Honeycomb – Craft&You Design Inspiration

Hello crafty friends!

Today, I’m back with a warm and textured card created with some fabulous new products from Craft&You Design – and I must say, I’m absolutely loving this release!


For this project, I played with the new stamps, dies, and stencil, and added lots of depth and grungy charm using Distress Oxide inks and sprays. The honeycomb background was the perfect base for my sunflowers, and the little bees brought the whole composition to life.

I layered the flowers for extra dimension and tucked in a rusty-style frame to complete the look. It’s messy, textured, and full of character – just the way I like it!

Let me know what you think – are you a fan of bees and sunflowers too? 

Used products:
🌻 Craft&You Design – New Stamps & Dies
🎨 Craft&You Design – New Stencil
🖌️ Distress Oxide Inks + Sprays

Thanks for stopping by!
Natalia 💛

Bright & Happy Card with Silhouette Flower Stencil

Bright & Happy Card with Silhouette Flower Stencil

Hello creative friends! 

Today I’m sharing a vibrant card I made using the beautiful Silhouette Flower stencil and the fabulous Prism Glimmer Mists from Hunkydory.


I absolutely love how these shimmering sprays blend together to create such a bold and colourful background! I layered the stencil over the misted panel to add soft, floral texture, and then finished the card with a clean sentiment banner that really pops.

These mists are perfect for anyone who enjoys working with colour, layers, and a bit of sparkle. I hope this project inspires you to get creative with stencils and sprays too!

Thanks for stopping by and see you soon!

Natalia 💛


Double Frame Magic with Wishmal Fairies – ABstudio Inspiration

Double Frame Magic with Wishmal Fairies – ABstudio Inspiration

 Hi All,

There’s something truly magical about creating with fairies - and this double frame featuring the beautiful Wishmal Fairies from ABstudio brought such joy to my creative heart. I combined various gorgeous papers from ABstudio to build this layered piece, letting each texture and pattern tell part of the story.


For the background with the fairy, I played with a stencil and Distress Oxide inks, blending soft shades and layering different media to create a dreamy, whimsical effect. The fairy peeks through the layers like she’s just fluttered into view - delicate, light, and full of wonder.

This project reminds me how art permits us to dream a little - to step into a world of soft colours, tiny wings, and quiet moments where imagination is the guide. I hope this piece brings a little light and inspiration to your day, just as it did to mine while I was creating it.

Thank you for stopping by. 

Sending warmth and fairy dust your way!

A Floral Window of Color & Light

A Floral Window of Color & Light

 Hello, crafty friends!

I’m back with another creation featuring the stunning A Circle of Anemones stamp from Hunkydory! This time, I wanted to try something a little different and add an airy, translucent effect to the design.

The flowers are stamped onto clear acetate, creating a delicate floating effect. Beneath them, I crafted a dreamy background using Glimmer Mists, adding depth and a soft shimmer that catches the light beautifully. The base layer is a Paper Colour Block, adding a vibrant contrast to the transparent focal point. For an extra touch, I used the same A Circle of Anemones stamp to create a subtle background pattern with Prism Ink - a simple yet effective way to add texture and dimension.

I love how this card came together - bold yet delicate, colorful yet balanced. What do you think of this style? Have you tried using acetate in your projects before? Let me know in the comments!

Happy crafting! 💕

Natalia

Create with Love: A Mixed Media Fairytale

Create with Love: A Mixed Media Fairytale

 Hello, dear creatives!

Today, I want to share with you a project straight from my heart—filled with delicate details, soft textures, and a touch of magic. This mixed media layout was inspired by the enchanting Wishmal Fairies from ABstudio, beautifully combined with the rustic charm of the Rustical Time collection.


When I saw these adorable dolls, I knew they deserved a dreamy, whimsical setting. I carefully colored them using Journal Dual Brush Pens, bringing them to life with soft, blended hues. Surrounding them with layered elements, organic shapes, and a textured background, I wanted to capture that feeling of wonder—like stepping into a fairytale world.

The base of my project is a richly textured paper from Rustical Time, which adds depth and a vintage touch. To enhance the composition, I played with contrast, adding splashes of black ink and subtle color accents. The butterflies and leaves create movement, symbolizing creativity taking flight.

Thank you for stopping by! I hope this project brings a little spark of inspiration to your day. Let me know in the comments—what’s your favorite way to add magic to your artwork?

With love,
Natalia

Crafting a Little Wonderland – Inspiration with ABstudio

Crafting a Little Wonderland – Inspiration with ABstudio

 Hello, crafty friends!

Today, I’m bringing a little bit of magic with a heart-shaped mixed-media project, full of layers, textures, and delicate details. I worked with the In My World papers from ABstudio, which have the perfect dreamy aesthetic for this piece.


I wanted to create a light, airy composition, so I cut out clouds from the paper and gave them extra depth using Distress Oxide. The soft blending effect adds a whimsical touch, making them look almost weightless. The houses tucked among the flowers bring a cozy feel, and to enhance their look, I added Glossy Accents to the rooftops. The same glossy finish appears on the little girl’s dress, making it stand out beautifully.

To complete the scene, I played with different embellishments—florals, butterflies, and a gentle splash of color here and there. The delicate black-and-white background pattern keeps everything balanced while letting the vibrant details shine.

This piece feels like a tiny escape into a peaceful, storybook world. I love how it turned out, and I hope it brings a bit of inspiration your way. Let me know what you think!

Happy crafting!

Winter Wonderland with Craft&You Design’s Paint over the Winter Collection

Winter Wonderland with Craft&You Design’s Paint over the Winter Collection

 Hello,

I’m excited to share this layout I created using the Paint over the Winter collection by Craft&You Design. This collection's delicate blues and frosty details beautifully capture the peaceful magic of winter.

For this piece, I used layers of wintery papers and embellishments, including intricate snowflakes and soft florals, to frame the enchanting scene of a girl with a deer. The image feels like a gentle winter dream, and I wanted to enhance that feeling with subtle textures and natural elements. I finished it off with the word "Dream," adding a soft touch of wonder to the piece.

Craft&You Design’s Paint over the Winter collection brings out the serene, dreamlike beauty of the winter season—perfect for any project that calls for a touch of magic and tranquility.


Hope this inspires you to create your own winter dreams!


Hello, Lovely - card

Hello, Lovely - card

Hello,
I present one of my favorite projects: a peaceful woodland scene on a standing A5 card. Creating this piece took some time, but the result was worth the effort! I decorated the background using distress inks and a leaf stencil, adding depth and naturalness to the composition. The focal point of the card features digital stamps from the Winnie-Daisy collection - Toadstools and cute mushrooms, colored with pencils to capture their details carefully. Together, they create a beautiful scene with Winnie surrounded by lush grass, expressing calmness and the beauty of nature. This memorable creative experience continues to inspire me to explore handmade crafts and their wonderful possibilities! 


Thank you for stopping by!


Photo page - art journal page

Photo page - art journal page

 Hi everyone! 

Today, I'd like to share my latest scrapbooking project, which took me about an hour of creative work. I hope it inspires you to create your own unique pages. You can see a page from my artistic journal, created using various techniques and materials in the photo.

To create this page, I used die-cuts, stamps, and Distress inks. The background was made using inks and applied with different techniques to achieve impressive color transitions and shading. Additionally, I used a grid die-cut as an extra background layer, adding texture and depth to the page.

Next, I added cut-out elements and stamps to create a complex composition. I used various die-cuts to create additional elements like the camera and clouds, which I carefully integrated into the whole. Finally, I added small details like arrows and clips to complete the page and give it the final touch.

Creating scrapbook pages is a great way for me to relax and express my creativity. I hope you enjoyed my project. If you have any questions about the techniques or materials used, I’ll be happy to answer them in the comments. Maybe you have your favorite scrapbooking techniques you'd like to share?


Thank you for your attention, and see you in the next post!


Hiking Days - wooden hoop

Hiking Days - wooden hoop

 Hello everyone!

Today, I would like to present my new layout in a wooden hoop, created using the Idyllic Woods collection from 3Quarter Design. This collection has absolutely stolen my heart, especially the sheet with the beautiful, picturesque forest. I immediately knew what I would do with it since we recently went on a charming trip to the mountains. I wanted to capture the magic of those moments and bring it into my project.

The beautiful, intricately cut embellishments wonderfully enhanced my work, adding depth and a unique character. Their vast variety ensures that everyone can find something perfect for themselves. Every element of this collection blends together perfectly, making the creative process a pure pleasure.

I hope my work inspires you to create your own unique projects.


Thank you for stopping by!


Memory - wooden hoop

Memory - wooden hoop

Hello,

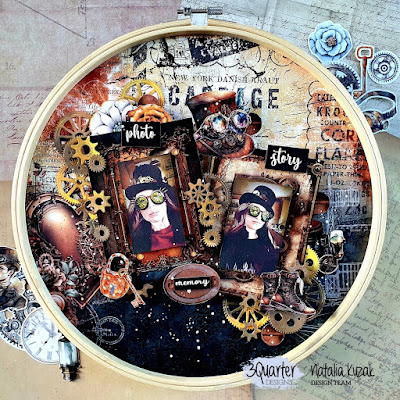
Today I want to present my LO on a wooden hoop using papers from the "Invention Age" collection by 3Quarter Designs. These steampunk atmospheres, which I really like, made working on them a pure pleasure. This collection has many patterns, from motif papers to plain ones, so everyone will find something for themselves. And let's not forget the fantastic chipboard embellishments that add an extra dimension to the piece. Wishing you all a wonderfully creative evening.


Thank you!


No rain no flowers - tag

No rain no flowers - tag

Hello!

Today, I'd like to show you another piece from the latest stamps collection by Polkadoodles. It's a tag decorated with flowers and a quote on a mixed-media background. The flowers were stamped on a background made with Distress Ink, kept in a blue tone. I'm thrilled with the possibilities these stamps offer.


Hope you like it!


Copyright © Natalia Kuzak Art , Blogger